
 The footwear industry always has room for entrepreneurs who will design shoes that are both cute and nonrestrictive to the natural shape of the foot. The first tool needed to experiment with custom shoe design is a shoe last. Traditionally, shoe lasts are carved from wood, but the steps outlined here allow you to quickly mold an amateur last with household supplies. The shape of the last determines the shape of the shoe, so molding one to your own foot lays the foundation for a shoe that fits perfectly.
This journey toward making custom shoes was prompted by a search for affordable shoes that would fit a display mannequin and also match different outfits. Most full-body display mannequins are mounted on a rod underneath one foot. When this is the case, a hole must be drilled in one shoe of each pair the mannequin wears, making the mannequin shoes worthless for wearing by a human. Custom mannequin shoes can be made with minimal reinforcement and a fabric sole, thus reducing cost and offering endless options for matching with different outfits.
Step 1: Wrap One Foot with Plastic Wrap
 To begin, wrap one foot in non-adhesive plastic wrap such as is normally used for food storage or packing. If one foot is larger than the other, wrap the larger foot. Use small pieces of tape to hold the plastic wrap on the foot. If the mannequin is fiberglass, use extreme caution to not scratch the paint. For fiberglass mannequins, place a 1" wide strip of cardstock vertically along the back of the heel up to the back of the ankle to protect the paint when cutting away the mold later.
Step 2: Wrap Packing Tape around the Plastic Wrap
 After wrapping the foot with plastic wrap, then layer at least three layers of clear packaging tape all around the foot, taking care to cut slices in the tape where needed so that the tape can be shaped smoothly with minimal wrinkling. Although about three layers of tape were used for the shoe last pictured, several additional layers would have been helpful to keep the last from warping slightly out of shape during filling.
Step 3: Cut Away the Foot Mold and Repair the Cut
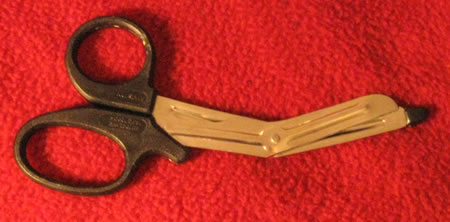
Whether making a last for a human or a mannequin, medical scissors available from medical supply stores are recommended. The plastic tip prevents damage or injury when cutting. When I used these scissors to cut away the mold from my foam mannequin, the tip gently pushed aside the foam rather than piercing it as sharp scissors would have done. Hold the scissors flat against the foot to reduce the width of the scissors. Cut a slit along the heel of the mold, and remove the mold from the foot. Close the cut with more layers of packing tape.
 Step 4: Fill the Foot Mold with Stuffing
Small pieces of stuffing are best for filling the foot mold. If using a solid piece of quilt batting, cut the batting into small pieces. Using scissors or another long object, reach into the mold to compress the stuffing during filling. The shoe last should be as firm as possible for greater ease of use. Two marbles mark the ankle protrusions on either side of the mold pictured, but this is optional. If desired, tape the marbles to the inside of the mold before filling so that the marbles stay in place. Also optional is a circular piece of firm foam at the top of the ankle to help retain the shape at the opening. Close the opening with several layers of packaging tape when filling is completed.
 Step 5: Cut a Fabric Covering for the Shoe Last
To cut a fabric covering for the shoe last, 1/8" wide graphic tape, such as the ChartPak graphic tape pictured, is helpful for marking the seam location. Stretchy knit fabric is easier to fit around the mold than woven fabric. Hold fabric tight against the bottom of the mold and mark along the black line that shows through the fabric. Repeat for the top of the mold, slitting the fabric in front of the ankle so that it is free to wrap around to the back. For the ankle, cut a round piece to attach to a rectangle. Cut 1/4" seam allowances on all pieces. Remove the graphic tape before sewing fabric around the mold.
Step 6: Sew the Fabric Covering in Place to Finish the Shoe Last
 Hand baste together the upper and lower foot pieces. Leave most of the vertical heel seam open. Machine stitch with a stretch stitch and remove the basting. Trim seams and place over foot mold. Stitch closed the remainder of the heel seam by hand. Machine stitch the ankle pieces together. Hand stitch in place around the ankle. Your custom shoe last is complete! When making shoe patterns, the graphic tape mentioned above can be used to lay design lines over the last. Drape shoe patterns with the same type of fabric that will be used for the finished shoe, whether knit or woven.